Blogger and Google drive both are offered by Google. One is for blogging and other for cloud storage. Both are used by millions of people. Blogger gives way to share anything you have and Google drive gives the power of securely save any file and share them with others. So if we take the combination of these two we can create any type of download site.Today you learn, how to build download sites by using these two services of Google. Before Start-: Before creating a download site, first you need to choose one purpose of your site. In other words,which users will come to your site.You need to Choose the content type and collect the required data. e.g.if you want to offer free music you need to collect the music files you want to share via your blog. Let start by creating your blogger blog.As we all know you need a Google account to use all products of google. First, create a google account if you not have one.If you already have a Google account, follow this guide to create a b...
Leadbolt is award wining Ad network which offers Android app monetization. It is the company who wins the trust of millions of users (publishers and advertisers) by fulfil their need in four-five year after launch.They gives an easiest way for app developers to add ads to their apps.Leadbolt offers multiple platform and ways to monetize apps.
Why Leadbolt?You may know that you can't use Admob by Google to monetize your app if you not have a Play Store developer account.Developer like me who does not have 25 dollars pay for Play Store Developer can't use Admob. In this manner Leadbolt is big alternative of Admob for such developer.You can earn money with Leadbolt and can publish your app to Play Store .
Let us know other advantages quickly-:
Quick and Easy Setup -
Setup of Leadbolt to Android apps is as easy as Admob.With 4-5 lines of code in 1-2 minutes.Any beginner developer can easily add it.
Fast Payments-
One of the big cause of their success in the ad network is their honest snd fast payment system.They give payment as they mentions in the docs. This makes their network better than others.
Multiple Types of Ads -
Leadbolt offers multiple types of Android apps which helps you to the right for your app.They offers native, Interstitial, direct deals, Rewarded Ads , Video Ads.
Support Multiple Platform -
Leadbolt support multiple platform so it another cause of its popularity.it supports Android (Java),IOS,Corona ,Admob,Cocos2d,SDKbox,Phonegap, Titanium ,Mopub etc.
Referral System-
They also offer an referral system with which you can a little by referring publishers and big by referring advertiser.
Approval Process -
Fast and easy approval process is a big advantage of the Leadbolt.
There are many other features you can know only by using it.
Let's get ready for the integration of Leadbolt ads to your Android App.To start first do these 4-5 steps-:
- Go to Leadbolt Website and Signup or login with Google.
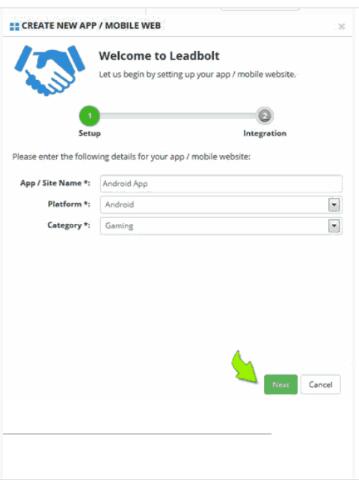
- After it Go to Apps and click on Create New App as shown below

- Enter App name,select it type and category and click on next.
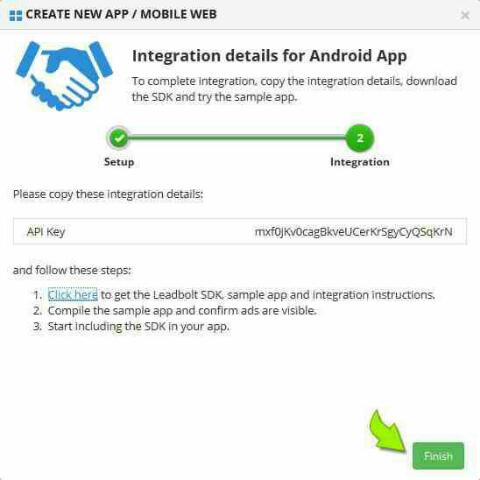
- Copy and note down your App Api key.Go to download sdk page by clicking on "Click Here "
- Download the Android sdk Unzip it.
 (Above 3 img Source: Leadbolt)
We divided this section into two parts. In one we setup our manifest file for ads and in second we add some java code to our activity class file to show ads on different events.
Adding code to Android Manifest
For showing any kind of ads we need to add two network permissions which is need to app for check and use the Internet connection to show the ads.
Add below code or permissions to your Android Manifest file
Open your MainActivity.java class file or any other in which you want to add Leadbolt Ads. After the "setcontentview(R.layout.maim)" in the onCreate function or simply in OnCreate method . Add code as below
@Override protected void onCreate(Bundle savedInstanceState)
{
super.onCreate(savedInstanceState);
setContentView(R.layout.activity_main);
if(savedInstanceState==null)
{
AppTracker.startSession(getApplicationContext(),"YOUR_APP_API_KEY",AppTracker.ENABLE_AUTO_CACHE);
}
AppTracker.loadModuleToCache(getApplicationContext(),"inapp");
}
Relpace YOUR_APP_API_KEY with your api key which we noted above.
Simply Add following code to show the ads on trigger of any event. e.g. you can show ads when user click on any button.
if(AppTracker.isAdReady("inapp"))
{
AppTracker.loadModule(getApplicationContext(),"inapp");
}
There is a good way to show ads on back key get presses. Showing Ads on Back key Pressed
Add below code to your activity class to show ads on back press
Above code shows the interstitial test ads only.
After adding code built the app and try. If you see a ads your integration is successed.
Now login to Leadbolt publisher portal and select the Apps from navigation.Click on the test mode situated below the app we added in the first steps. Select Submit for review and approval. Thats all,wait for 1-3 days. After your app is ready ass it to free stores.
Last Lines-:You can show video ads as well as Rewarded apps,direct deal ads after the approval.You can also contact the advertisers directly. If you have any problem during above process please comment below.We tries to solve it and don't forget to Like Us
Comments
Post a Comment